Monday, December 23, 2013

Finishing up in 2013

That's both finishing sewing projects and finishing the year. Incredible isn't it? I've already got plans for some quilts for next year, and took advantage of a fabric sale this morning at Fabric Spot. It's a Canadian business with modern fabrics. They offer great shipping rates, and an order of over $100 ships free in Canada. Need I say that I took advantage of this? My Christmas present to myself! And for the next few days you can get 25% off your whole order. That's the icing on the Christmas cake!

Anyway, I digress. Today I finished another baby quilt, this one is for my niece's baby boy who is due in February. I felt like a change and on the advice of my friend Lisa, I made the Giant Starflower Block from the tutorial by Jeni at In Color Order . The squares to make the HSTs are cut at 18" and then cut on the diagonal. I did all this, and then found that the quilt was going to be much too big, so I cut all the triangles down again. I now have enough triangles cut to make another 3 quilts!

The new size square is 12 3/4", not a convenient size to cut, I agree. Next time I would just cut with a
 12 1/2" square ruler.


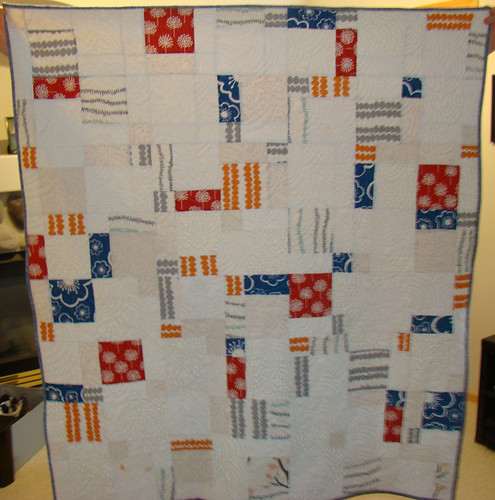
The quilt measures 45" square, a convenient size for a baby, I think. The tutorial finished at 68" square, quite a difference.

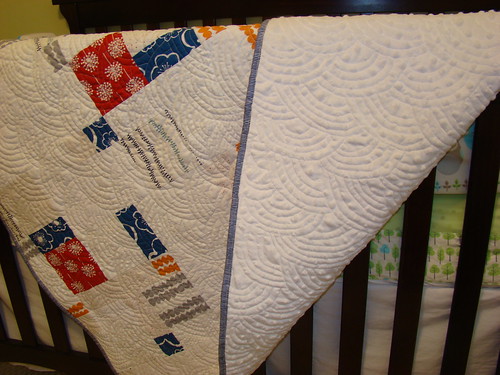
The binding is scrappy, since I had so much left over fabric! It's backed in turquoise minky.

I got carried away with the FMQing. I've been watching the Angela Walters classes on Craftsy, this time the class on Quilting Negative Space. Of course, you learn something every time. Well, lots of things really, but there is always one hard lesson.  I started with the white areas, and really I should have started in the middle and worked outward. Anyway, it came out right. Relief!

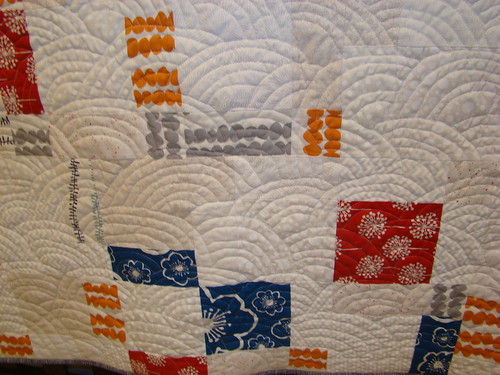
Here are some closeups of the different quilting patterns I used:

Paisley in the background. It's not white, it has a faint green dot.


Wiggly lines:


Swirls:


Meander with loops:


I also tried two designs I liked less ( or made a worse job of, take your pick!) A meander with double loops really depended on ending the second loop in the same place as the first. It was hard to see. I also tried combining swirls with a pointy leaf. Let's just say the leaf didn't look very leafy.

Here's the quilt showing a bit of the back:


Also, I put on a burst of speed , ha!, and finally made my block Perennial Pleasures into a cushion cover.  
I had intended it to back it with some hand piecing I did. Let's just say that hand piecing is not my forte and leave it at that!


I'm glad it's done and in use at last.

So to all my quilty friends, have a very Happy Christmas and enjoy yourselves with your families. I've loved reading all your blogs, and I look forward to much more in 2014.

Best Wishes, and see you in 2014!

Linking to Sewing With Certainty, a series at Quilty Habit


Monday, December 2, 2013

Christmas Crafting

I thought I would share my recent Christmas projects with you. Christmas is so rapidly approaching, so I was glad that I joined the Advent Calendar Quilt Along at Better Off Thread. There is a link up with pics of finished calendars here . They all looked so pretty!

Here's a picture of mine, now in use. Since it's intended for a baby this year, it was hard to find things that were small enough, but still suitable for an 8 month old. This will be much easier in years to come!


The same baby also needed a Christmas stocking. I used a tutorial on Sew Like My Mom and made the fabric for front and back from 2 1/2 inch squares. It is not quite finished - I still need to embroider the name on the cuff.


Then I thought I would make a Christmas pillowcase for each of my GDs. Well, they are winter themed really, so they will get more use out of them. The fabric line is Brr by Laurie Wisbrun. I have quite a bit in my stash, so it was finally time to cut into it!


I've still got a few more small sewing gifts to make, and then I'll start baking. Are you making some things for Christmas?

Till next time,

Sue

Linking to:


Kitchen Table Art

Sunday, December 1, 2013

Versatile D9P

I'm sure you all know that the title of this post refers to the Disappearing 9 Patch. It's a quilt block that can look very different depending on the layout you use.

While I was visiting my DS recently I saw one of my older quilts there. I don't know about you, but once a quilt leaves my house, I forget about it. And when I meet it again it's a bit of a shock. I think:

  1)  That looks quite nice
  2) How did I do that again?

The quilt I'm talking about was made in 2010, and I didn't take any pics of it. So I put that right.


This quilt is made from D9P blocks. I took a class, I knew nothing about it at all. The teacher advised me with the neutral coloured fabric, good advice I think!

The backing is a Mount Fuji print for my tree and mountain loving DS. I called the quilt Mountains of the Moon.


I FMQd it with a scrolly design using a stencil and chalk. Altogether a great learning experience.


Fast forward to this year. I made a little boy quilt featuring fussy cut truck fabrics, and the parents and I liked the D9P layout here:


I blogged about it here.

Then I read Kristy Daum's blog and tutorial on her Modernized D9P, and I made two baby quilts using her method as a guide. I wanted more low volume, so I added a number of 9 patches that were all neutrals, and no bright print at all. Here they are :


DSC05635

So there you have it. Four different looking quilts, all using the same block. I'm sure there will be more sometime.

Till next time,

Sue

Sunday, November 17, 2013

Baby Quilt # 2 Finished

My last post showed you pictures of a baby quilt made using lots of low volume prints and white on white with a little Echo and some other brights.

I'm glad to announce that I've finished the second quilt too! The format is similar, Modernized D9P per the tutorial by Kristy Daum found here .

It's so much fun moving the blocks about to find the layout you like the best. I'm sure no two quilts could ever be the same.

 This time I used oranges and yellows from a charm square swap, a very little Kate Spain, and a  touch of Echo.

It's backed in white Minky, and I quilted it all over in a design called Paisley.


The border is an orange and white print from my stash, just perfect I think!

Here's the back showing the lovely soft Minky and the quilting.


Till next time,

Sue

Saturday, November 9, 2013

Baby Quilt #1 finished!

Two of my DD's friends are having babies this month. When I agreed to make baby quilts the deadline was still far off. Not any more!

The first one is finished, and I couldn't be more pleased with how it turned out. I used Kristy Daum's tutorial for Modern D9P, found here .  I did as Kristy suggests, and played with fabrics and layouts to make it "mine".


DSC05635

Instead of a single white background, I used lots of different white on whites and a few other low volumes. I like the effect. I also increased the number of background squares to give it more negative space.


DSC05632


The backing is white Minky, and the binding is a narrow stripe in navy blue, just right for a little boy I hope!


DSC05633

The quilting is freehand Baptist fans. I love the effect, and I really enjoyed doing the quilting.


DSC05634

This was a quick and fun baby quilt to make.

Linking to


Tuesday, October 29, 2013

Blogger's Quilt Festival Part 2

AmysCreativeSide

The Blogger's Quilt Festival at Amy's Creative Side is a chance to see hundreds of beautiful quilts, each one a favourite of its creator. I've decided to join the fun and enter two of mine. One is my Swoon Monster Quilt in the home machine quilted category.

This quilt is in the scrap quilt category.

My DD had asked me to make a quilt for our guest room, the colours to be pink and brown to echo the colours in some art prints on the wall. I'll be honest, I had never thought of using those colours! We started collecting scraps and fat quarters , and before long I was happy with the colour choices.

I knew I wanted it to be scrappy and started making  bordered squares in different sizes. I spent a whole quilt retreat on it. Days and days of boxes. Fortunately by some fluke I made the boxes in sizes that would fit together: 2.5, 5, 7.5 and 10 inch. Fitting them together into an arrangement that I liked took some time, but finally it came together.


My friend commented that the quilt made her think of chocolate ice cream, and so we called it Neapolitan.
There's more strawberry than chocolate anyway! 

I quilted it on my home machine in a pattern called orange peel. The backing is from Connecting Threads with a pattern exactly like that same quilting pattern. The dark brown border is actually pink dots on brown and the outer border was the first fabric that we got, that inspired us in the first place. The binding is Kona, I can't remember which brown.


The quilt measures 88" by 96"

I hope you will enjoy browsing all the great quilts in the Blogger's Quilt Festival. I know I will!

Blogger's Quilt Festival

I'm sure that by now you know that the Blogger's Quilt Festival is on at Amy's Creative Side. It's fun to browse a different category every day (or every few hours!). While admiring the quilts today, I decided to enter two of my favourites. This is my first time entering, and I'm excited!

The first quilt I'm entering is in the  favourite home machine quilted category, and it is my Enormous Swoon Quilt. A lot of the fabrics I used are from the Gypsy Bandana line, so I toyed with names like Swooning Over a Gypsy and so on, but due to its size it got called The White Elephant. I blogged about this quilt hereand here, and various other posts along the way.

Today I set off to take some more pictures of it. I really should have checked the batteries in the camera. Perhaps taking two dogs wasn't the best idea. Maybe I should have taken pictures before the first snowfall too. The bright sunshine made pictures hard. No more excuses!


Since I entered in the home quilted category, I'll tell you a bit about the quilting. This quilt is a lot of firsts: first quilt-as-you-go, first feathers. Really that's the reason it took me so long to finish - I knew what I wanted to do, but was scared to try! Each of the Swoon blocks was sandwiched and quilted in a geometric pattern that echoed the star. I used a colour to match the star in each case. Then I joined them together with the white sashing, and quilted feathers on all the white strips larger than 1 inch. Angela Walters' class on Etsy was my savior there.

Here are a few closeups of my quilting:


One last picture of my favourite quilt:


Swoon quilt, finished at last!

Quilt stats:

fabric: Gypsy Bandana by Pillow and Maxfield, and other coordinating fabrics
size: 100" by 105"
backing: randomly placed left over from the front
binding: diagonal rainbow stripes
quilted by me

Now I'm going to view some more quilts at the Blogger's Quilt Festival. So much to see!


AmysCreativeSide

Monday, September 9, 2013

Super Tote!

It's no secret that I LOVE tote bags! My family likes to tease me because I keep my quilting projects separated in tote bags lined up in one corner of my sewing/living room. A real bag lady! I also like a tote for when I travel. It has to be large with lots of pockets, and must fit under the airline seat in front of me. Let others fill the overhead bins with huge wheelie bags, - when I want my ereader, or my snack, I don't even have to get up!

My previous bag for this purpose was Noodlehead's Nikki tote, blogged about here in Feb 2012.
When I saw the new Noodlehead pattern for the Super Tote, I knew it was perfect for me.

I don't know about you, you are probably lots more sensible, but when I have a project calling to me, I want to start RIGHT AWAY! The Nikki tote suffered from this, as the fabric available to me in home decorator weight was more a case of finding "I can live with it" rather than " I love it".

I prefer my bags to be in heavier fabric because I'm always lugging heavy stuff onto the plane. Don't ask, it's quite a variety! From yards of fabric, vintage T shirts, to Sudoku books. So when I had the opportunity to choose some fabric for the Super Tote from Terry's Fabrics in England, I gave the task my full attention. I knew I wanted 100% cotton, and then I wallowed in all the lovely colours and designs in home decorator weight.

I'm not a terribly experienced bag maker, and the pattern is quite lengthy, but it all goes together beautifully. I started cutting on Thursday, and finished on Monday. Oh ,and life went on as well in that time!

Here's the front:


The back:


This is the gusset, one of my favourite parts:


Inside the bag, showing the recessed zipper and the elasticized pockets:
The front again showing the front pocket open:


Lastly, here's how it will look being carried. Isn't it pretty?!!


I was in a real rush to finish this bag, I will be travelling in less than a week.
Next time I will put two inside zip pockets in the lining above the elasticized pockets.
I would also have liked a magnetic clasp holding the front pocket closed. Instead I used a large old fashioned snap fastening. It works fine!

The fabric is
Charnwood  mimosa
Bowden mimosa
and Dotty in smoke

all are from terrysfabrics.co.uk

Till next time,

Sue


Linking to


Better Off Thread